How to Transfer Large Files via the Internet
 Marketing Manager at FileWhopper.
WWS contributor

You’ve finally finished editing a presentation video, a large document, a mixtape, or a batch of images, and you want to share it with your client, co-worker, or family member. And then it hits you: You can’t email your large file since Outlook limits you to 20 MB, both Gmail and Yahoo limit you to 25 MB, and Yandex restricts the maximum size of messages with attachments to 30 MB.
With more and more businesses going digital, companies are relying on file-sharing solutions to send and receive data. Luckily, modern technology has brought about many benefits, and one of which is that you can easily share files over the internet.
However, there is a catch. Transferring large files online can be a complicated and expensive process, to say nothing of file size limitations, which can be really frustrating. You probably already know how big of a problem sending huge amounts of data can be.
So, if you have a file exceeding the allowable limit, what options do you have?
Let’s check them out.
1. File Compression
You probably are thinking of compressing large files to reduce their size and make them easy to send. Software like 7-Zip can compress an entire folder of files simultaneously. The software comes in handy if you have multiple files like photos or audio files and you want to send them as one folder.
Zip files save time and space while, at the same time, keeping your files intact so you don’t have to worry about data loss. Plus, you can extract Zip files on any machine, regardless of the operating system.
2. Use a VPN Service
Surprised? Well, many people don’t know this, but you can actually use a Virtual Private Network (VPN) to share large files online.
If your internet service provider uses broadband traffic management to moderate upload bandwidth rather than download, using a VPN can help to mask your online activities. This means that your ISP cannot recognize the types of files you are sending and, more importantly, how large your files are.
However, we do not recommend using this method of file sharing for two reasons:
- There is no guarantee your files will get to the recipient intact.
- Large files will dramatically slow down your VPN connection, which means you probably won't be able to use the internet during the file transfer.
3. Use FTP
If you don’t want to compress files before sharing them, you can use File Transfer Protocol (FTP) to share any types of files online.
A few years back, security was the main concern when using FTP. Currently, security protocols like FTPS and SFTP make it safer to send files over the internet.
FTP is ideal for a business setting, but home users might find the entire process too complicated. Plus, you need access to a remote server to use this method of file sharing.
4. USB Flash Drives and External Drives
You can opt to save your files to a USB flash drive or hard disk drive and have it mailed to your boss, co-worker, or family friend.
But, as you can imagine, if it's something urgent or the data is sensitive, the risks are too high. Plus, time wastage can be a real issue.
Advanced Methods to Send Large Photo Files Securely Over the Internet
With advanced cameras and camera phones, the quality of images is ever increasing. And your collection of photos can add up to hundreds or thousands of gigabytes – especially if you work with photos a lot.
So, what is the most convenient method to send large photo files securely over the internet?
A tool like FileWhopper is an innovative service that meets all your modern file-sharing needs. Unlike popular cloud services like Google Drive, Dropbox, and OneDrive, FileWhopper does not have file size limits. No matter how large your file or folder is – whether 1GB, 50GB, 200GB, or 10TB – it's nothing FileWhopper can't handle.
With that in mind, you’d imagine this file-sharing solution would be pricey, right? Well, surprise, surprise! It's one of the cheapest file-sharing services today – you only need to pay a one-time fee based on your file or folder size. It is a pay-as-you-go service, which means you don’t need to commit to a monthly or annual subscription.
Your files are secure, and you won't need to compress them. The user interface is clean, and you can tell that the app is easy to use. You just need to upload your files and follow a few steps – and the files will be on their way to your recipient(s) in no time.
Step by Step Guide to Use File Whopper for Large File Sharing Online
Using FileWhopper is pretty easy and straightforward.
Here are the simple steps to follow:
Step 1: Visit the FileWhopper website and choose whether you want to upload a file or folder. From the homepage, you will see a slider that you can use to calculate the cost of transferring files and folders of different sizes.
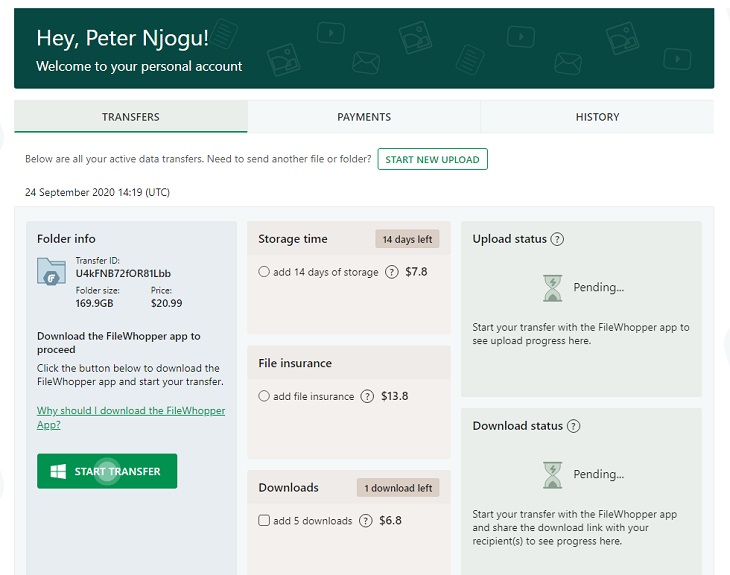
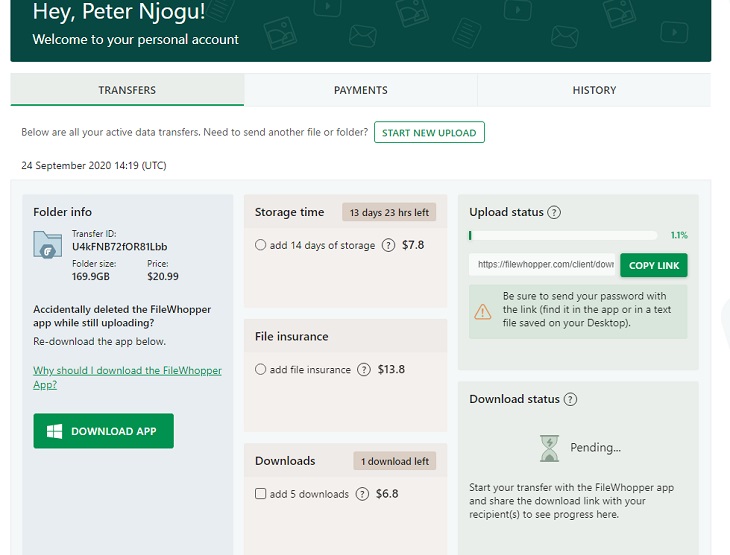
Step 2: Once your file/folder has been uploaded successfully, you will be taken to a screen showing the details regarding the file transfer. From the screen, you can see how much it will cost you, your transfer ID, and additional services.
By default, your files will remain on FileWhopper’s servers for 14 days before they auto-delete. If you want to extend the days, you can request additional days for a small fee.
Step 3: To proceed, you need to register first. Simply click the “Registration” button and follow the prompts to complete the registration process.
Create a strong password and proceed to make your payment.
Step 4: Now, with everything sorted out, it's time to initiate the transfer. Click the “Start Transfer” button and save the FileWhopper app to your desktop.
Step 5: Once the app is downloaded, run it. You may wonder why we use an app for transferring files, right? Here’s why:
- For starters, the tiny app doesn't need installation, and it auto-deletes once the job is done.
- The FileWhopper app makes the process of transferring files fast and secure. All data is encrypted, and combined with your password, the app ensures that the process is safe.
- The app uses multi-threaded data transfer technology, ensuring that data is uploaded and downloaded with the highest speeds possible.
- The FileWhopper app can resume the transfer if your computer shuts down unexpectedly or if the internet disconnects.
Step 6: You can see that your data is encrypted with an auto-generated password. Check the box below your password to save it as a text file to your desktop.
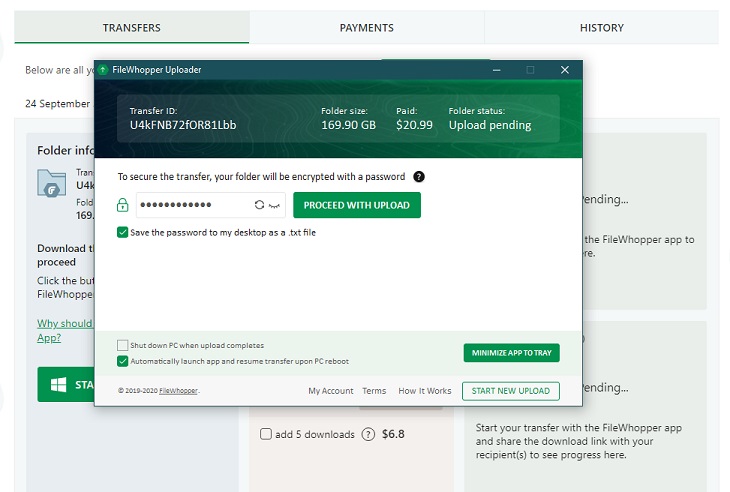
Step 7: Click “Proceed with upload” and drag or upload the file/folder you want to transfer. Important note: This should be the file/folder you were charged for.
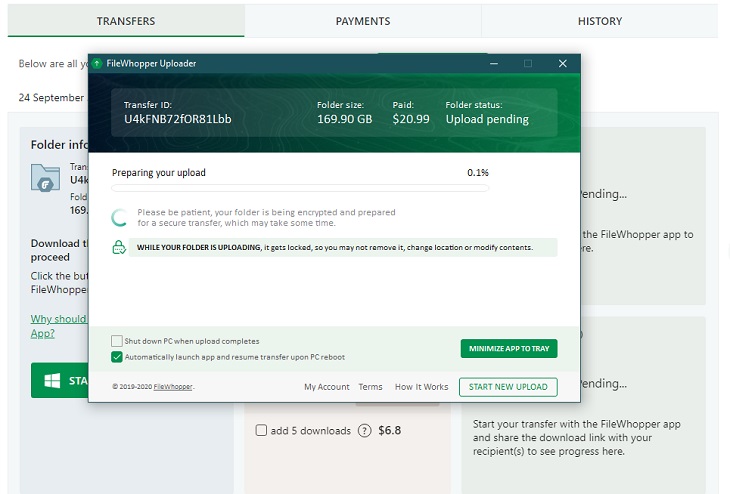
Step 8: Next, click “Start Upload” and wait patiently as your file/folder is being encrypted and prepared for transfer.

Step 9: When your file/folder is ready, a download link will be generated, and you can share it with your recipient(s).
Step 10: You can check the progress of the upload right from within the app. Once you share the download link with your recipient(s), you can also check the progress of the download from the app.
Ultimately, advanced tools like FileWhopper can make transferring your large files and folders over the internet not only fast and secure, but also hassle-free. But remember your connection speed can impact and determine how long it takes to transfer a large file or folder.