How to Create Powerful Social Media Content with PosterMyWall

Maintaining a strong social media presence is an ongoing process. To maximize social media engagement, you need a constant stream of new content. And everything you post must be on-brand and high quality. The more often you post new, fresh content, the more often your followers will return--and share.
So how do you make that happen—without devoting yourself 24/7 to social media creation?
One of the best ways to create lots of great social media content is with a tool like PosterMyWall.com. This online design and promotion tool features professionally designed templates you can use as a starting point to create dynamic social media content that will excite and engage your followers.
Just pick a template and customize the images, background, colors, copy, and fonts. In minutes, you’ll have a new graphic that’s fresh, original, and completely you.
PosterMyWall even has tools that let you publish to the web or post to social media without leaving the site.
Steps to Create Dynamic Social Media Posts with PosterMyWall
Create your own dynamic social media post in five easy steps:
1. Complete a quick orientation.
If you’ve never been to PosterMyWall before, start with their Beginner’s Guide to PosterMyWall. This will teach you everything you need to know to get started.
2. Select a template.
From there, visit the PosterMyWall gallery. Browse through the templates or use the search function to find exactly what you need. For instance, if you’re looking for a template for a Halloween event, type “Halloween” into the search box.
Depending on the term you’ve chosen, you’ll get one or several categories to choose from. Select the most relevant. (I selected “Halloween flyers”) to reveal sub-categories. The sub-categories that came up from my Halloween search included “sale,” “costume contest,” “party,” and “pumpkin carving contest.”
Next, use the “Browse by size” menu that runs down the left side of your page to narrow your options to only include templates that match the size of graphic you need. If you’re creating a social media post, click “Social Media Graphics” to reveal more choices. There, you’ll be able to find exactly what you’re looking for whether it's an Instagram Story, Facebook Post, Pinterest Graphic, or something else.
Click the type of graphic you want to narrow down your choices even further, then assess the remaining template options. If you’d like to see an enlarged preview of one or more of your choices, just click on the thumbnail. Browse until you find the template you want--then, from the enlarged view, click “Customize Template” to open the PosterMyWall editor.
Remember, the image doesn’t have to be exactly what you want--the template is just your starting point.
3. Create your graphic.
Once your template is open in the editor, you can click on different parts of the template to customize. Following the instructions from the Beginner’s Guide, you can change the background, swap out your own images, customize the copy, add more information, add a video background or inset, animate the copy, and make other changes until your design is exactly what you had in mind.
3. Download your design
Once you’ve completed your design, you can download a basic quality image for free. What’s great is that this image won’t have a watermark and is great for sharing online! (That is unless you’ve selected a Getty stock image. The free downloads of Getty images contain a Getty watermark. If you’d like to remove the watermark, you can either purchase a high-resolution web-quality download for $4.99 USD or replace the Getty image with royalty-free images.)
Your design is now ready to upload to your social media page.
(Please note that basic quality/low res files of flyers, posters, and other marketing materials from PosterMyWall will carry a PosterMyWall watermark. The only way around this is to purchase a higher quality download or purchase a PosterMyWall Premium subscription.)
5. Schedule your post
Once you’ve downloaded your post, it’s ready for you to upload directly to your social media platform or your social media scheduling tool.
Or, if you’re a PosterMyWall Premium or Premium Plus subscriber, you can schedule your post directly from PosterMyWall to Facebook and Twitter. This is a great option because it eliminates the steps of downloading your design from PosterMyWall and uploading it to your social media platform.
Just click the “My Stuff” tab located near the top left of the window, locate your design and click to select it. Then click the publish option above your design. This will give you a number of options: Social Media, Email Campaign, Digital Signage, and more.
Click on Social Media, then select your platform of choice. Follow the directions to connect to your page, add a caption to support your image, click publish--and you’re done.
If you need more help, visit one of PosterMyWall’s Help Center guides on:
- Publishing on Social Media
- Scheduling on Social Media
Bonus: Resize and Repurpose
Once you’ve created your graphic, you can save even more time by resizing it to use on other social media platforms, on print fliers, on your website, in your emails, and pretty much anywhere else you’d like to use it.
Open your graphic in the PosterMyWall editor and click resize on the top, middle-right of the page. Select the size you want (or sizes if you want multiple versions) and click “Copy and Resize.” New tabs will open and you now have a new version (or versions). In case you still need it, your original design file remains unchanged.
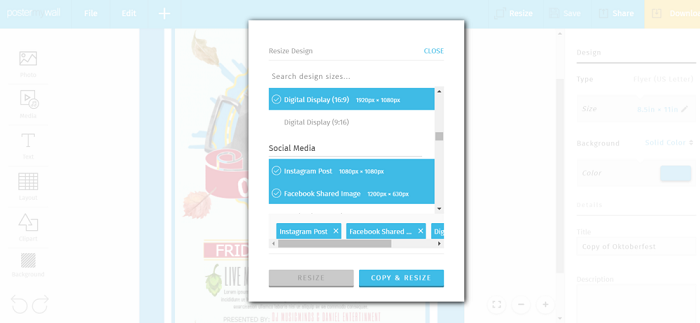
Be sure to inspect your new versions before you use them. You may have to adjust some design elements after resizing a design.
In conclusion
PosterMyWall’s easy-to-master tools can make it fast and effortless to maintain a strong social media presence. Finally, the task of content creation has become a little less arduous.
Now the only thing you have to figure out is what to do with all of the time you free up.


: What It Is and Why You Need It")