iPhone Proxy: How You Can Shield Your Phone's IP (And Why)

One thing you can depend on when using iPhones is the level of innovation in some of the applications. The phones have some fantastic features that place them ahead of most brands.
However, the one thing they have not cracked is how to give their customers online anonymity. Fortunately, with tools such as proxies, it is possible to hide your iPhone’s IP address.
You may think that a proxy only works well for PC or laptops. The truth is installing one on your iOS mobile platform is also possible and a smart move. With the right proxy, remote servers will not be able to determine your exact location.
But why would you want to shield your phone’s IP and exact location?
Well, browsing the internet becomes safer since cybercriminals and other persons snooping online won't be able to detect you and where you are located.
iPhone users can shield their IP address relatively easily when using their phones using the right proxy. We will show you how below, but first let’s get the basics out of the way.
What Are They iPhone Proxies?
An iPhone proxy is not very different from other proxies. Let's take the example of a SOCKS proxy. It is an online computer that creates an intermediary between your browser and the remote servers.
When you type in a request, it goes through the proxy before forwarding to the remote server. When the remote server responds, the data goes through the same proxy before reaching you. It’s sort of an intermediary.
Many things happened during the process. There is sieving of information to remove any harmful content. The socks proxy Shields your IP address using its own. Remember, your IP is a dead giveaway to your exact location. It is exactly like a physical address but on the online platform.
With a proxy, whoever gets access to the information during the exchange will not determine where it is coming from. Without revealing your IP location, you can also bypass geo-blocking or data restrictions.
Why You May Need a Proxy for Your iPhone
An iPhone proxy is important if you use the internet outside of your home. It could be at work, school, or even an open network. You want to be able to browse the internet without revealing your IP address and exposing your data to cybercriminals and snoopers lurking around.
Public networks may also have restrictions on the sites you can visit. It is a fantastic way to monitor the activities of employees or students while online. However, if you want more browsing freedom, the proxy will help you bypass such measures.
How to Configuring an iPhone Proxy
Follow the steps below to configure your iPhone proxy.
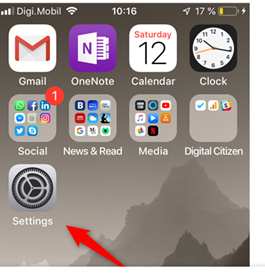
Step 1: Go to Settings on your iPhone
Step 2: Now go to Wi-Fi then click on your Wi-Fi network
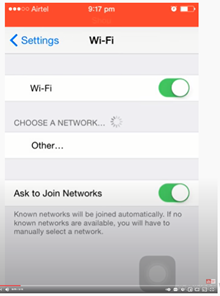
Step 3: Enable the configure proxies tab at the bottom of your screen.
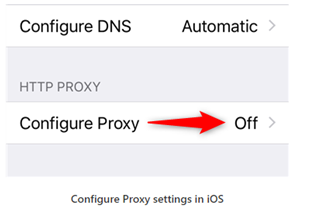
Now follow the steps below if you want manual or auto-configuration.
Configuring Proxy Using the Auto Option
Check the bottom of the page to see the HTTP proxies available. You will need to select the auto option to connect.
iPhone, by default, selects the off option every time you connect to a Wi-Fi network.
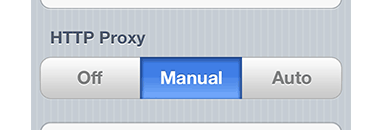
With the auto option, your phone uses the Web Proxy Auto-Discovery Protocol (WPAD) to configure proxy settings automatically. It will first determine whether you need a proxy on that particular network.
If you are using a .PAC File: -
- Select the Auto Action.
- Enter the auto-configuration in the URL window to enable your proxy. You will get the relevant script from the proxy provider.
Configuring Your Proxy Settings Using the Manual Option
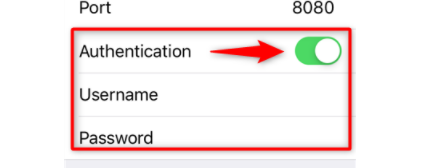
- Tap the manual button
- Enter the details of the port and server. Your proxy provider should be able to give you the details when you are buying it
- Check that your IP address is not in the whitelist section on the dashboard
- Turn on authentication
- Enter your username and password. Your proxy provider will provide you with authentication details if any
- Go back to your Wi-Fi window. The action will allow you to save the changes you have made automatically.
Take note of the following when running your configurations
- Pay attention to how you input the relevant data. If you have a wrong entry, you will not be able to connect to the proxy server.
- Every Wi-Fi network has its unique proxy settings. It means every time you connect to the new Wi-Fi, you have to reconfigure your iPad. The situation will happen if you use a different network at home and another at work. You may, however, get an alert asking you to give access to the new network connection. It depends on the proxy you are using. It will look something like this.
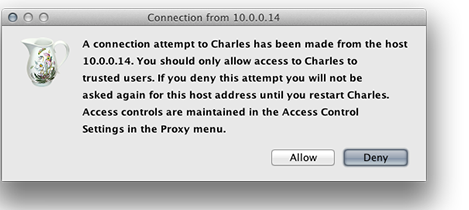
In this case, Charles refers to the proxy. All other networks we'll have to go through that proxy before you get access to the material
- Do not forget to save changes. You will find the relevant button on the top right corner of your iPhone.
Configuring your iPhone Proxy for Mobile Networks
What happens in the case when you want to use your mobile network and not Wi-Fi connection? It is possible to configure your iPhone appropriately.
Note, the process is technical, so do your research well. You must modify the proxy Global HTTP setting. You can achieve this through: -
- The use of an apple configurator via your Mac computer. Backup all your documents before you start because it will wipe your phone clean.
- You can custom write your XML profile if you do not have access to a Mac computer. If you take this route, let an expert do it for you. The process is very technical, and you do not want to damage your phone.
Check out the Apple community forums for more information and support on how to go about it.
In Conclusion
It is important to protect yourself while online. You do not want everyone to see your IP address, which makes it easy to track your exact location. Hackers can also use your IP address to find areas of vulnerability that they can exploit. By using a proxy on your iPhone, it will give you that security.
The process of setting it up is not difficult. It’s as easy as the step-by-step guide listed above. Remember to get the relevant details from your proxy provider. You will need that information to configure your iPhone properly.


